Land Rover Defender Upstand Corrosion Repair
Land Rover Defender Corrosion issues
I promised to do some posts about our planned trip, which we are due to depart on in 11 days. As of now we have not even booked the channel tunnel crossing or got our international driving permits. We are cutting it fine this year.
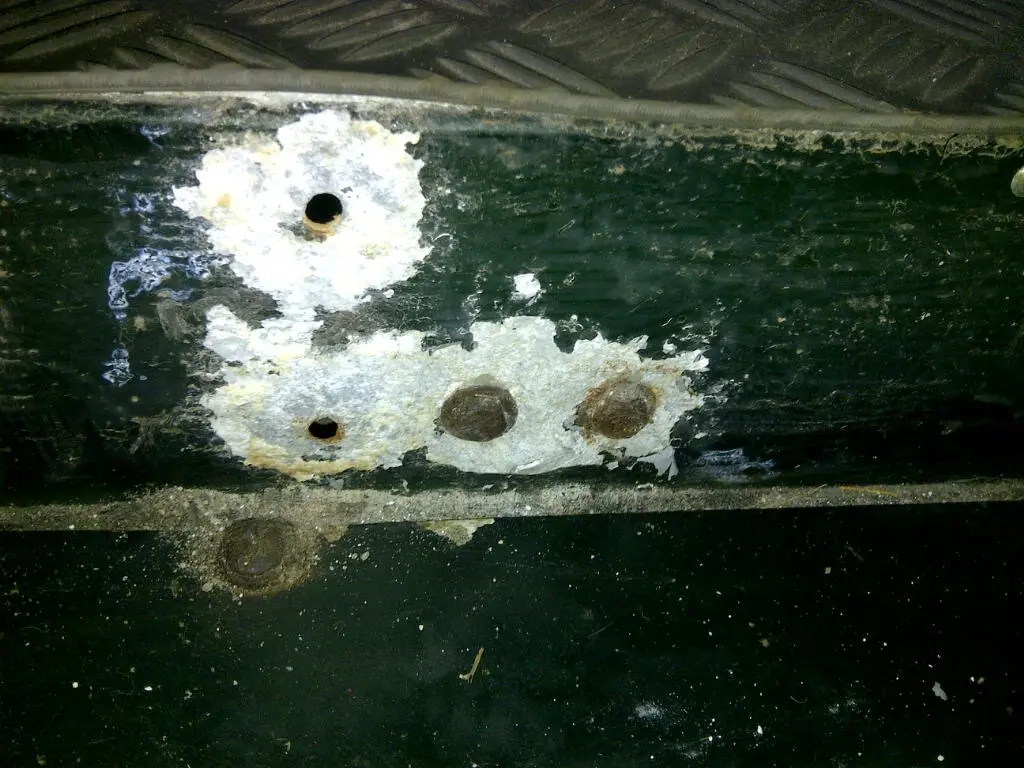
Every Defender 110 owner knows about the corrosion issues which are commonly found on the vehicles. This post is about repairing the area, where the second row seats mount to the vehicle. The photo shows some horrible corrosion I needed to get fixed before we went. It is in the area of the second-row seat brackets on the upstand. Fairly typical of what happens when you combine steel and aluminium. Forming and Electrolytic corrosion cell.
Right now I am in the throws of stripping the floor and getting the panel out. The end caps were particularly hard due to a hidden solid rivet under the c-post bracket.
The new panels are from YRM, I got the upstanding and end brackets from them. I also have a galvanised crossmember I am not sure if I will fit that yet.
These pictures are taken mid-process and in chronological order.


The second-row floor is out. This was a bit of a hassle as all the screws were seized. I have no power in the vehicle so a grinder was not an option. The upstand/ upriser is out and the mid-cross member is out.
I have also cleaned up around the mid-cross member mountings and put stone chip paint on them to give them some protection.


Now at the stage of re-assembly. It has been a slow road even to strip the backdown.
The new mid-cross member is galvanised and from YRM metal solutions. One of the nice features of the new one is that the top brackets are loose rather than welded on this makes it easier to get the cross member under the fuel pipes etc.

The only problem I have had with the crossmember is that the holes, for mounting to the chassis rails were about 3mm out across the vehicle. I am not entirely sure why, but I eventually managed to get the bolts in. I suspect it may have been partially due to the camber of the road. I’ve used stainless bolts so far.

One thing to note on the cross-member is that the cut-out for the fuel hoses on my vehicle is in the wrong location. This probably varies from vehicle to vehicle. One way YRM could improve this is to have a wider cut-out. I have added additional protection and will tywrap the hoses out of the way.
Once the crossmember was in it was time to start fitting the upstand/upriser. The new item is a different size to the old one. In a good way. The lips are about another 10mm deep. This means that around the top a certain amount of fitting is required, this is around the spars under the floor and the doubler between the separate sections of the floor near the doors. I only cut out these areas, I like the idea of the extra depth.
The new item seemed longer also, so I did not have to cut it down. The reason is that the old panel was tapered making the top shorter than the bottom edge. I spaced it evenly on each side and it seems ok.

With the fitting done, I have now dry fitted it, drilled the holes for the top rivets and will tomorrow drill the sides pieces and seat brackets. At the moment the rivets are all loose. I will strip it out and paint it once I have dry-assembled it.
The floor is in with a couple of screws at the moment.
I managed to get the Upstand and floor fitted and the two central seat brackets.

Tomorrow when my drill is charged again, I’ll get ready for the last two seat brackets, when I get the bolts on Monday they’ll be fitted. I should also be able to refit the soundproofing tomorrow, that is the rubber chequer plate stuff from Write off road. As sold to the MOD. I had not finished fitting it due to this repair, needing to be done.

Not much of an update tonight, with the ongoing repair apart from to show some pictures of the panel now it has been fully tweaked and drilled to fit.
I finished off the drilling tonight and deburred everything.
The final job for the night was to give another coat of etch primer and paint the seat brackets and new panels with stone chip paint.
They are now drying, so tomorrow I’ll start fitting it for real. The only thing I need to do is drill the seat brackets in location.
I am hopeful with a push, I should have it done tomorrow or Sunday at the latest. Not wishing to tempt fate!


The Landy is now back to normal the whole repair is done, seats are in soundproofing back.
Now we have the fun of packing for the trip. Sorry, I did not take a picture of the finished article! But the picture above shows the first of three seats fitted.

Dan’s a windsurfing, adventure-seeking nomad with a passion for exploring the globe overland and an Engineer. Having grown up in the Middle East, he brings a unique perspective to Getting Lost Again, sharing his love for discovering hidden gems and embracing the unexpected. When he’s not on the road, he finds inspiration in windsurfing and other creative pursuits – and is equally at home under a vehicle solving problems as he is exploring a new place.