Troopy Build Series: LandCruiser 78-Series Overlander
Background before the Troopy
When we left the UK, all the way back in January 2014 we had to sell our previous Overland Vehicle, which at the time was a Land Rover Defender 110 – 300TDI. We were very fond of that vehicle, “Tusky” had taken us for many years all over both Eastern Europe and West Europe, the Balkans and into places further afield, like Albania.
We’d spent countless hours working on the Defender, with limited resources. Most of the work was done on the street in front of our home as we had no drive or garage. Done by myself to get her to where we needed her as a vehicle for a small family to travel. i.e. Overlanding in Europe. Work ranged from GVM suspension upgrades to bodywork and floor rebuilds, to relatively minor engine upgrades, maintenance, electrical work and dual battery systems.
This is the first of a series of posts on building our 78-Series Troopy from a standard vehicle straight out of the factory to our next overlanding vehicle. This post will serve as an overview and reference to specific posts we do on each aspect of our build.
TIP! – Use the table of contents to jump to specifics, if you don’t want to read this super-long post! We will update this post with links to specific posts as we progress through the 78-Series.
78-Series Troopy
- Background before the Troopy
- 70-Series Landcruiser Waiting Time
- Why a 70-Series Troopy?
- Second Stage Manufacture (SSM)- Pre-Registration Mods
- Camper conversion of the Troopy
- Vehicle Track Correction
- Suspension – GVM Upgrade
- Other Essential Troopy Upgrades for Overlanders
- Sound Proofing
- Sound System
- UHF Radio
- Troopy – Air Conditioning Performance Upgrades
- Freezebrain Aircon Amplifier
- Water System, Shower and 12-volt Water Heater
- Diesel Space Air Heater – Installation
- What’s Next:
- 12V Auxiliary Batteries and Solar
- Wall Panels
- Utility Hatches
- Air System
- Interior Fitout
- Front Cab Upgrades
- Still to come in the Troopy Overland Build
Since moving to Australia, we have continued to travel, by conventional means exploring places like Japan and Australia on our doorstep. After arriving in Victoria, we had a Subaru Forester, which we purchased second-hand. The Forester has taken us to many places, served us well and is surprisingly capable. But we have always wanted to get back out and about Overlanding with a “proper” vehicle.
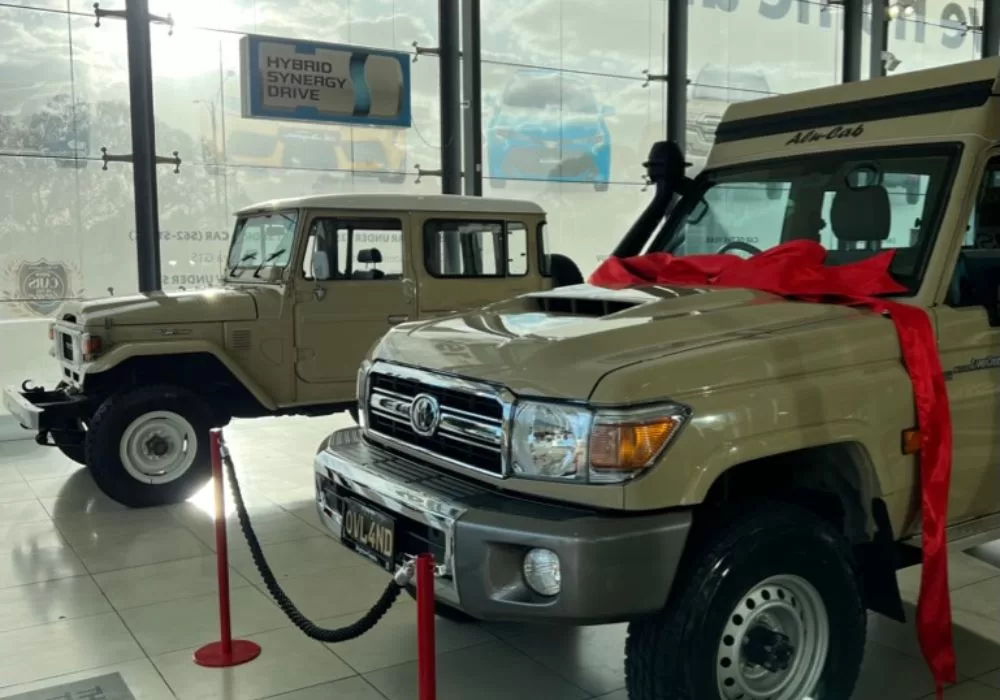
Roll forward a decade the Subaru Forester, has clocked up over 340,000km, whilst our daughter was going through school. During the pandemic, we decided it was time to get back into our passion. In 2021, we ordered a new vehicle, this time a Toyota Landcruiser 78-series. Commonly known as a Troopy
70-Series Landcruiser Waiting Time
2.5 years later… If you can remember back to the pandemic, the world went crazy. Here in Melbourne (Australia), we had 6 lockdowns, yes you read that right! During that time the supply chain also went crazy we ordered our Troopy in 2021 and had to wait almost 2.5 years to get the keys. We eventually took delivery in October 2023, after many broken promises from Toyota (Brighton).
In the meantime, we did contemplate our options, but one of the key drivers for vehicle choice was wanting a camper/pop-top camping option so that we could get out of the weather. If you have followed us previously, you will know we have been caught in a roof tent a few times in nasty conditions.
Why a 70-Series Troopy?
Our choice of vehicle had probably been made at least 10 years ago. If you’re familiar with our previous history, I was always torn between a Land Rover Defender and a Toyota LandCruiser. Having owned the Defender 110 for many years, one of the things I did not like was not knowing the history, there was about 200,000km of its history that was out of my control and being sure that a vehicle has been historically well maintained, is crucial to reliability and dependability. So our next vehicle was going to be new. I think any overlander would agree that reliability and dependability are critical to their enjoyment.
The Landcruiser 70-Series has a legendary status around the world. It has always been known for being reliable and tough. The design has been largely unchanged for the last 30 years and despite this, it is loved by not only overlanders, and 4WD enthusiasts but also government agencies, big mining organisations and aid agencies not to mention the military. It is not uncommon to hear of vehicles with over 400,000km clocked up.
In Australia, the 79-Series UTE (that’s a pickup in the US) has the following of a sub-cult and is often written off to tax by tradies. The 76-Series saloon is also a popular choice and although it has a few options for a roof conversion, is somewhat smaller especially if one plans to live out of the vehicle for extended periods.
Why didn’t we choose an Ineos Grenadier as our next Overlander?
Considering when we ordered our vehicle, it would be fair to ask about our thoughts on the Ineos.
When the Ineos Grenadier first appeared, I was very excited, everything I had read and heard made the vehicle seem like the perfect choice, although it is shorter (4,856mm) than the 78-series (5,245mm), it is similar to a Defender 110 (4,600mm) and 76-series (4,900mm) saloon in length, so could have been a potentially viable option, it probably will be a viable option in the future.
Ineos chose to partner the Defender cross G-Wagon-like looks with a ladder chassis, coil springs, solid axles and the amazing 3.0L Turbo BMW engine and the ZF-Auto box. These features make the vehicle amazing both on and off-road. We had a great time test-driving one.
What stopped us from ordering an Ineos, was not that we did not like the vehicle, we loved it, but the lack of accessories available that would make it a truly capable overlander for extended travel away from civilisation. The main issues for us were the fuel tank size and the lack of roof conversation, which is no longer the case. We needed a larger fuel tank and the ability to live and sleep inside the vehicle. The other area of concern was the ability to fit a large water tank, again at the time there were no options available. I’m sure that given the time, more accessories will become available.
Why didn’t we choose a Land Rover Defender as our next Overland Vehicle?
New “old-style” Defenders are no longer available, manufacture was ceased in 2016, so there was not an option there although we would have been able to get accessories and also a pop-top roof camper, like the Alu-Cab Hercules or Icarus. As well as long-range tanks etc. The other factor behind not wanting a Defender was safety, I know a Troopy is not the safest vehicle, but it is certainly safer than an old-style Defender (IMHO).
The latest Defender if I am honest was never going to be an option, because I just don’t like the look of it, not to mention that it has the same issues for us as the Ineos, in that there is no roof conversion available.
Second Stage Manufacture (SSM)- Pre-Registration Mods
It’s important to realise that here in Australia there are pretty strict requirements around certain vehicle modifications, and the requirements vary from State to State. So to ensure compliance across all States, it is easier to have any changes to the vehicle done before registration, i.e. pre-rego. Doing this is called Second Stage Manufacture (SSM) and the process entails getting any vehicle changes completed before vehicle registration by a competent body and importantly having the changes certified by a competent Engineer. This enables the modifications to be considered part of the vehicle’s base specification ensuring ADR (Australian Design Rules) compliance.
Opting for pre-registration modifications via SSM offers several advantages. Firstly, it ensures nationwide recognition of the changes, simplifying interstate travel and future re-registrations. Additionally, SSM typically permits more extensive modifications than post-registration alterations. The streamlined process avoids potential delays associated with individual approvals and certifications. Finally, SSM modifications, listed on the compliance plate, can enhance the vehicle’s resale value by assuring buyers of professional workmanship and adherence to safety regulations.
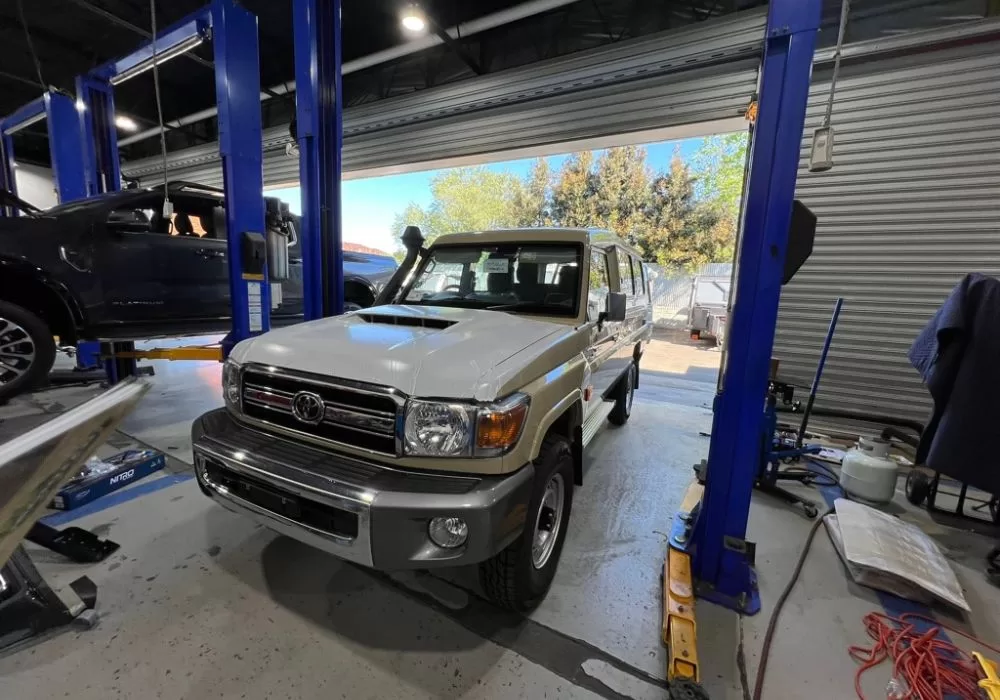
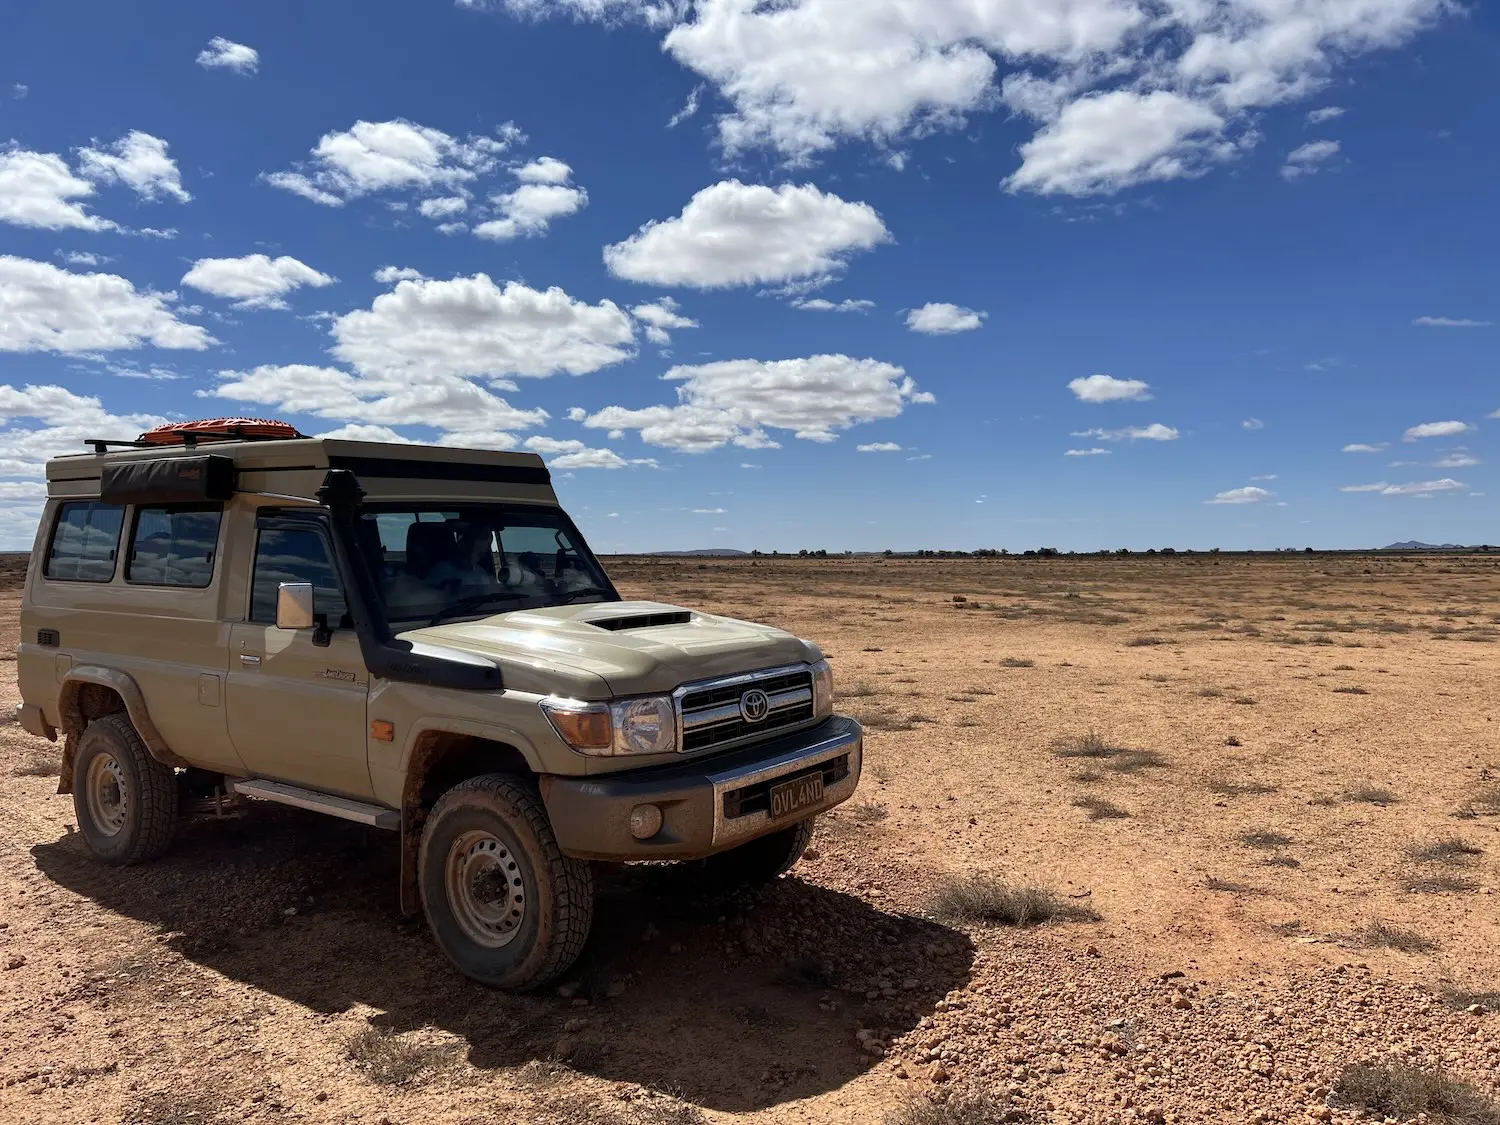
In order for the Troopy to become the viable Overlander/Camper we wanted, there was a selection of changes we considered essential. The main items we had changed as SSM pre-rego, were the Roof Conversion, the GVM (Gross-Vehicle Mass) upgrade and the rear axle track correction by Multidrive Technology, we installed the Tru Tracker.
Camper conversion of the Troopy
Anyone who has travelled by vehicle for a longer period knows that there are times when certain issues can make it a challenge and impact overall enjoyment and fatigue, the main one of those is weather.
What the roof conversion enables, is for the inside of the vehicle to have two levels of accommodation and the ability to stand up. During the day the bed can be pushed out of the way into the roof area so that you can stand and move around in the vehicle, at night the bed is lowered, which enables a comfortable night in a double bed.
Why an Alu-Cab Roof Conversion?
In the end, we chose to install an Alu-Cab Hercules roof conversion on our LandCruiser. Mainly because at the time it was convenient. I believe that the Hercules is one of the first of its type. But there are other choices, and to be honest we would probably choose a different solution now because, like most things in life, I don’t feel that Alu-Cab has kept up with the competition. Other options these days are Mungo, Head Space and Alu-Innovations.
When combined with well-thought-out storage and systems, a roof conversion such as the Alu-Cab Hercules, enables a comfortable and warm seating area for those days where the elements are more challenging. The cabinets in our vehicle are also designed to enable stealth camping should we need to stop and sleep without attracting attention. Not that a Troopy does not catch the eye!

Other advantages of the roof conversion are that the setup time is about 1 minute and if you are camping in difficult terrain or a confined space, the footprint of the space is not being shared with a tent or other arrangement. We have stayed on mountains with limited space for a vehicle, let alone a tent. Sometimes we find spaces where rocks and such make it hard to camp too.
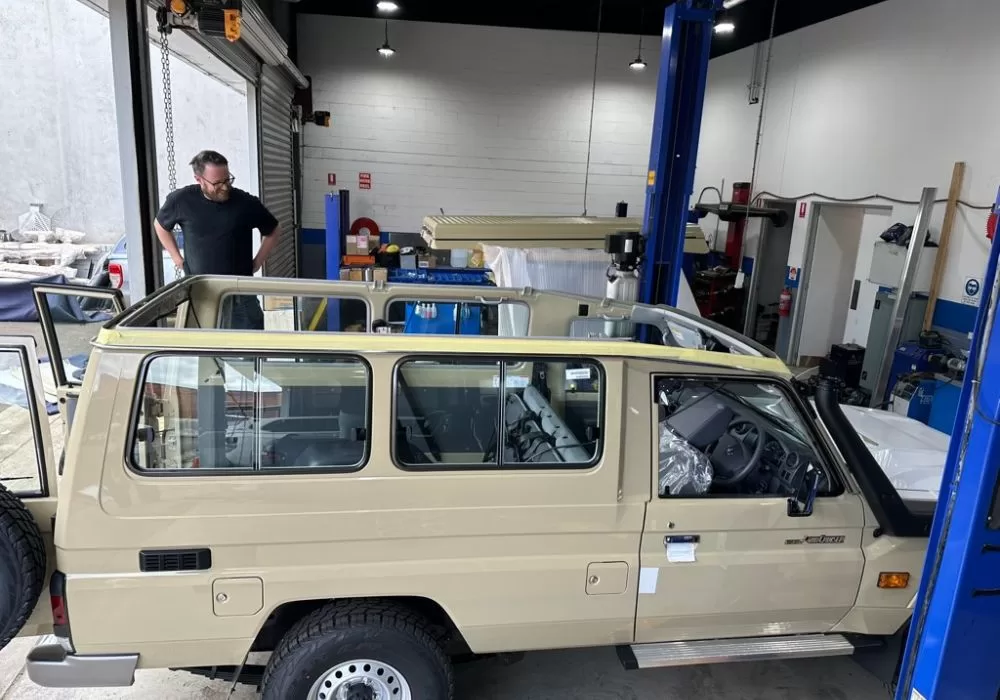
Alu-Cab Installation Problems
The other reason we would probably choose another option now is that we had a horrific experience with our installation by the local Ironman 4×4 agent, Discover 4×4 in Melbourne, since our installation, they seem to have since gone out of business or at least the shop has closed down. I guess what goes around comes around. Having said this, after we got in touch with Alu-Cab South Africa our issues were picked up by Ironman Australia and their head office dealt with installing a new roof conversion.
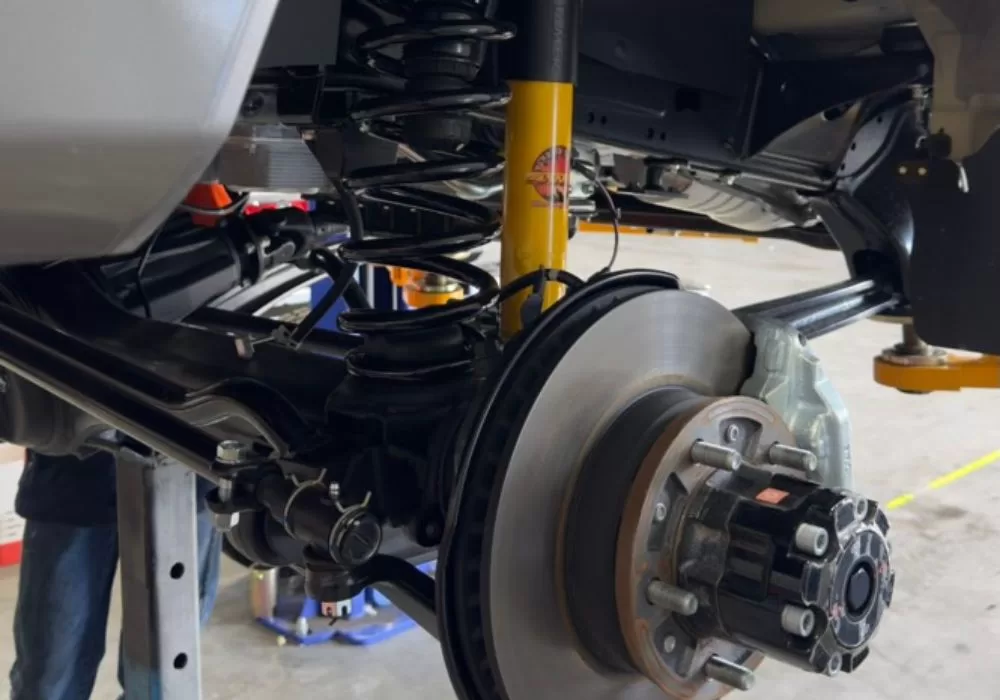
Vehicle Track Correction
The 70-series Landcruiser has been around for decades, and the design has remained largely unchanged, certainly when it comes to body, chassis and running gear. Having said that there have been updates over the years, one of which was the change to the V8 4.5 litre engine (1VD-FTV). There was an impact from this change that was never rectified by Toyota, in that to accommodate the V8 engine, it was necessary to widen the front axle.
Sounds sensible right, but the increase of 100mm across the vehicle track was not rectified or corrected on the rear axle. This means that the track of the rear axle on a 70-series even now in 2024, is 100mm less than the front axle.
The problem created by this track difference will be unnoticed by many and many will be unaware of the issue. The problem with the track difference across the vehicle is that in certain conditions it can affect vehicle performance. For instance, in soft sand, it can cause the vehicle to wander. It can also have a minor impact in towing situations.
From this, there has been an opportunity for many 4WD companies across the world to offer solutions, these range from wheel spacers and offset wheels through to full axle housing and diff corrections. We opted for a Multidrive-developed Tru Tracker solution, which essentially moves the stub axles out by 50mm on each side of the rear axle.
Multidrive completed the work in Geelong, they replaced the stub axles by cutting the originals down to allow for the new ones to be bolted in place. The modification also requires new internal drive shafts (half-shafts) for the diff housing.
Suspension – GVM Upgrade
The 2023 Troopy (78-Series) had a higher stock GVM than previous years, I believe this is due to being able to meet the safety requirements of Australia. By slightly changing the vehicle category, the safety compliance requirements are slightly less. The 2023 vehicles, as a result, needed larger indicators and also had collision detection systems installed.
Having said that, we calculated the likely payload of the vehicle in the final state for our global travels and realised there was not much headroom. So we opted to get the vehicle GVM upgraded as part of the SSM process. This would avoid headaches later. We opted to have this done at Multidrive also in Geelong and they installed the Terrain Taimer upgrade to allow the vehicle to be changed to 3,870kg.
The Terrain Tamer gear includes parabolic springs and also upgraded front springs as well as shocks all around.
Other Essential Troopy Upgrades for Overlanders
Needless to say, our changes to the vehicle, did not stop at just pre-rego, our plan is to complete most modifications ourselves.
Sound Proofing

In stock form, the Troopy is not quiet. One of the main sources of noise is the roof, which for us was dealt with by the Roof Conversion. However, once we had the vehicle, we needed to make the Troopy quieter. We did this using a kit from Car Builders. The process is easy, but takes a while and does require the interior to be stripped. We’ll post about this soon. The difference is remarkable.
Sound System
The stock Toyota sound system is terrible. Yes, it has Bluetooth but not much else. We opted to install new speakers in the standard positions, door pods and speakers in the front and a new CarPlay/Android Auto head unit, these were all from Alpine and made a huge difference. For instance, providing a reverse camera and Google Maps etc.
UHF Radio
Because we will be travelling on remote tracks and may need to communicate with other road users, such as road trains or caravans to overtake or for other safety reasons we have chosen to install a UHF Radio, it is common practice to use UHF radio whilst on tracks such as the Canning Stock Route (CSR) to warn users by announcing your presence and direction of travel on a track, this helps avoid collisions.
The UHF Radio 4WD market has a lot of products to choose from and the internet is littered with reviews, it can get pretty confusing comparing what radios are available. We wanted to find the best UHF Radio for our Overland travel so we did a detailed comparison to help us choose which UHF Radio was right for our build.
The key features we were looking for were:
- The radio unit had to be compact so that we could install it inside the dash or the Troopy and above the glove box.
- The controls had to be all via the handset and not on the head unit/radio module.
- Settings were adjustable via an app. I wanted to have an app for adjusting the settings rather than having to use the handset, which can get fiddly.
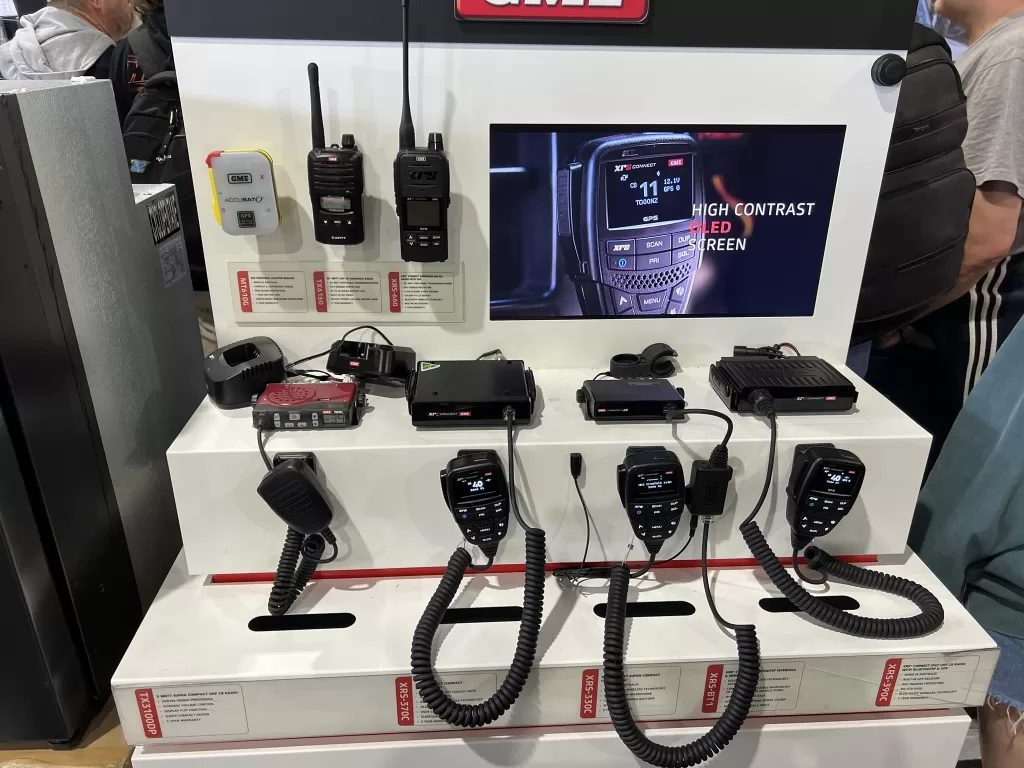
Wanting an app for settings might sound silly, but my past experience with a compact radio unit in our old Land Rover Defender was that adjusting settings can get annoying via the handset.
We’ll add a post about how we did the install in a future episode!
Troopy – Air Conditioning Performance Upgrades
The airconditioning system in Troopies and the Land Cruiser 70 Series in general are often criticized for their poor performance, particularly here in hot Australian climates. As far as I understand this is due to its outdated design and a few key limitations:
- Vehicle Thermal Design: The Troopy and all of the 70-series LandCruisers, have very little insulation and what is fitted at the build has limited performance in terms of keeping sound or heat out. One of the most effective ways of improving the performance of the aircon is by improving the insulation of the vehicle, to stop the heat from getting in and cold getting out.
- Undersized Components: The air conditioning system, particularly the compressor and condenser, is often considered inadequate for the vehicle’s size and the harsh Australian heat. This leads to a struggle to maintain comfortable cabin temperatures in extreme conditions.
- Limited Airflow: The design of the vents and ducting can restrict airflow, further hindering the system’s effectiveness.
- Inefficient Evaporator: The evaporator, responsible for cooling the air, might not be optimized for the challenging climate, resulting in less-than-ideal cooling performance.
Luckily, there are solutions available, to improve the performance, the first and simplest is tinting the windows with high-performance tinting to reduce the heat getting in via the vehicle glass.
The second improvement to be made would be by insulating the vehicle, we used a kit from Car Builders to not only deaden the panels but also to thermally insulate the vehicle, which is going to be used as an overland camper and it was necessary for increased overnight comfort as well as helping to improve the aircon performance by improving the thermal properties of the vehicle.
Freezebrain Aircon Amplifier
The third improvement we are going to be doing is installing an improved AC (Air Conditioning) Amplifier (88650-60G20), this part was originally made for Toyota by Denso and is a direct replacement for the Toyota LC70 aircon controller.
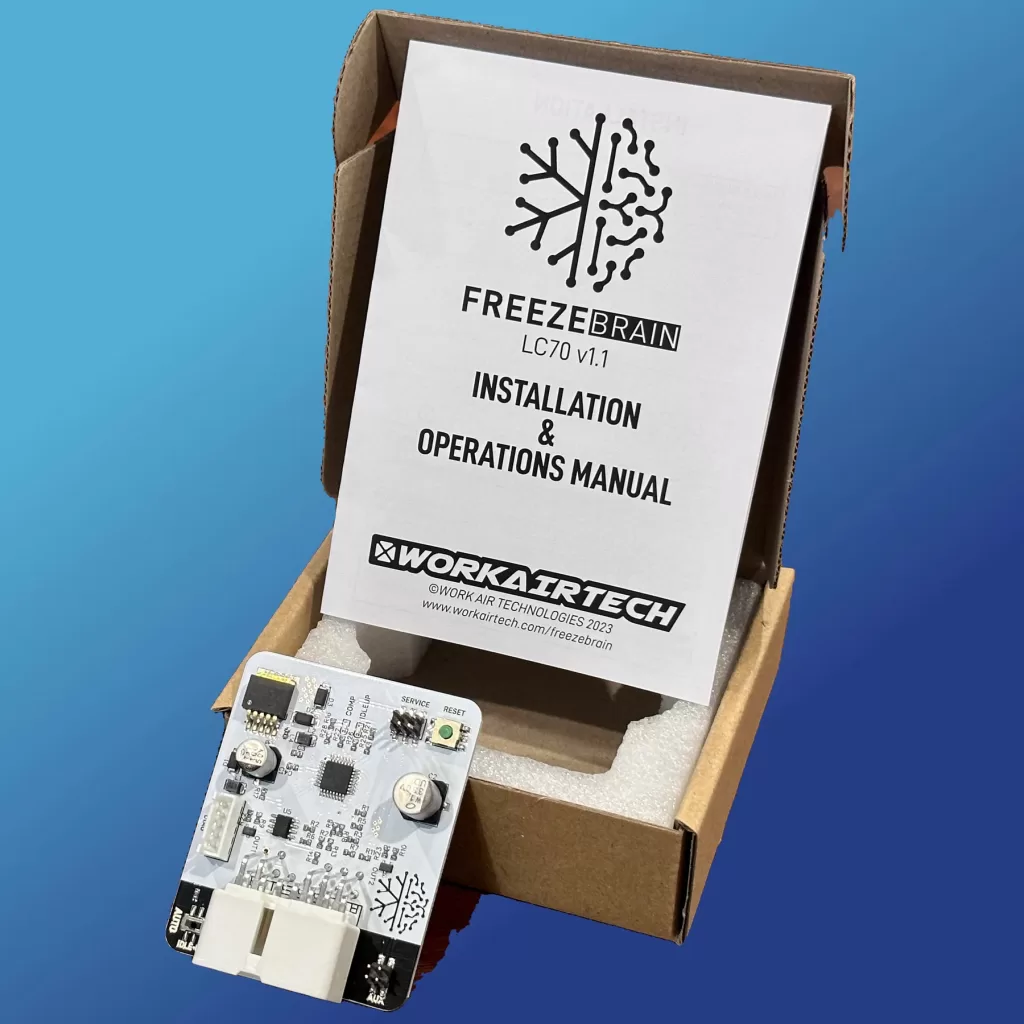
There is a company here in Australia, that makes an aftermarket AC amplifier for the LC 70-series, which is called a Freezebrain. This promises to improve evaporator performance by changing the lower temperature limit allowed by the standard part by 5 degrees Celcius.
The Freezebrain takes less than 10 minutes to install behind the passenger side speaker and glovebox, the only tools you will need are a 10mm socket and a small flat-blade screwdriver.
Check out our post on installing this 70-Series Aircon Performance Improvement.
Water System, Shower and 12-volt Water Heater
The water system on the Troopy is designed to allow us to have access to clean drinking water and hot showers. The shower is accessible via the Gullwing, which is behind the driver’s side door, we opted for a Drifta Gullwing, which was easy to install and has so far been awesome. However, we did have a minor leak via one of the corner welds, which a small blob of silicon fixed.
To store the clean water we opted for a 90L underslung water tank, which is mounted to the floor. The tank is shaped to go around the rear prop shaft and the hand brake cable is routed through the tank.
The tank is from Long Range Automotive based in Lilydale, Victoria (Australia). The hot water is complemented by a Duoetto 10L 12-volt/240-volt water heater and two Seaflo water pumps.
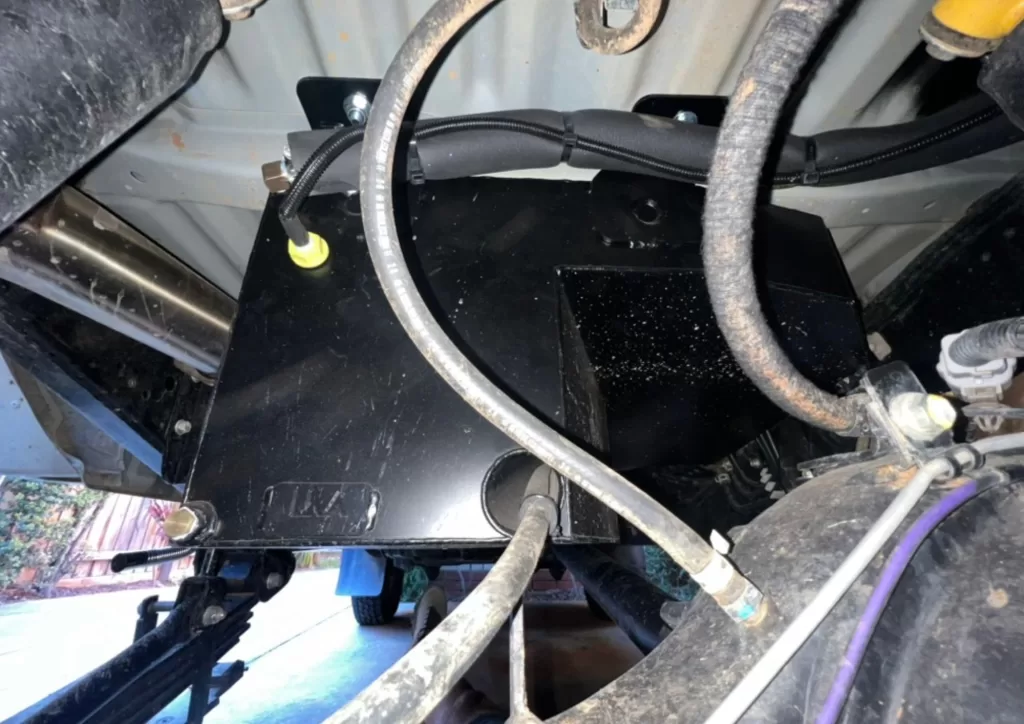
The water system has two circuits, one for clean potable water and the other for non-potable water. Check out the complete water system installation here.
Diesel Space Air Heater – Installation

As we plan to travel globally and do not want to be restricted to warm weather and many layers of clothes, we have installed a Diesel 2kW heater in the camper setup, sometimes known as a night heater or space heater. We also have a 12v heated blanket to help through the night.
What’s Next:
We are currently working on a whole bunch of changes to make the Troopy our vehicle for touring, check out our Instagram account if you want to know more, we’ll write more as time allows, but see below for some of the other aspects we are working on.
12V Auxiliary Batteries and Solar
In order to support simple things like the fridge and lighting, as well as water heating, induction cooking and general life on the road, we are installing a fairly comprehensive 12V system in the Troopy.
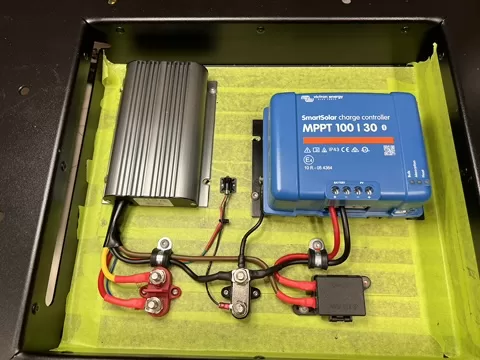
The key components are:
- Two 120AH Lithium batteries (240AH total)
- 2kW Renogy Inverter
- Two 120W shingled solar panels on the roof (mounted to the Alu-Cab Hercules) – Connected to the Victron Smart Solar Controller
- We’ll be using Scanstrut cable glands for the install
- 200W solar blanket – Connected to the Redarc 1240D DCDC Charger
- Redarc 1240D DCDC Charger
- Victron SmartSolar MPPT 100/30
We’ll post a link to the full install, with diagrams/schematics and parts shortly.
Wall Panels
We have fitted both sides of the rear with side-wall panels from Mission 4×4.
Utility Hatches
Both sides of the Troopy have utility hatches from Mission 4×4. This is to allow for water, air, 12v awning lights and also solar.
Air System
Because we are planning to travel to a variety of places, which are not all accessible via a paved road, we often have to “air down” our tyres as we go offroad. This is either to make the ride more comfortable on corrugations, which is also mechanically sympathetic to the vehicle, or because the terrain, such as soft sand requires it. The number one reason people get stuck in sand is IMHO because they have failed to use the correct air pressure.
During the build, we have been using a portable compressor, specifically a Kings Thumper, which was fine, I would recommend one to anyone. The disadvantage of it though is that because it requires setup, it is a little bit of a hassle to use. The other disadvantage is that because it is not permanently mounted, it takes up valuable storage space.
We have fixed both of these issues by mounting an ARB Twin compressor in the unused wall (wing) cavity behind the passenger seat. The compressor is mounted on the recessed wall panels which we have fitted to the vehicle, from Mission 4×4. The Air is connected to an ARB coupling in the side access panel on the outside of the vehicle. It is so easy to use the compressor now, press the button on the dash and plug in the hose.
The space-saving is huge, considering the limited storage capacity of the Troopy.
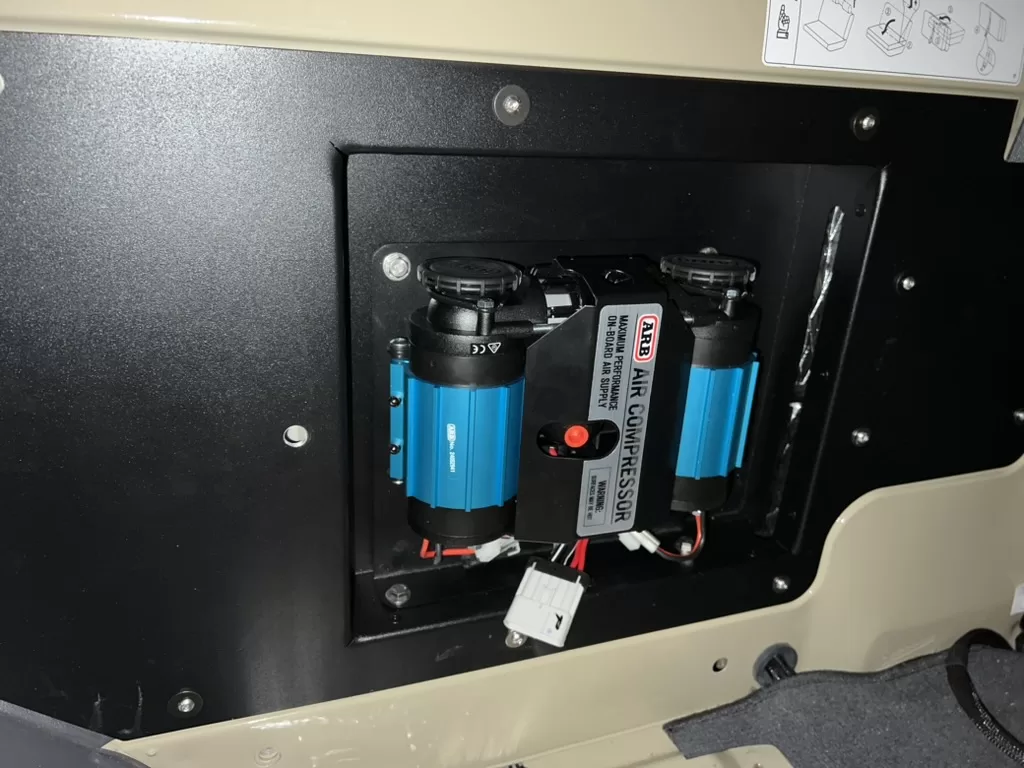
We are undecided about the need for an Air Tank/Reservoir at this stage and will keep you posted. Look out for our post on the compressor install later, here.
Interior Fitout
We have been building an interior layout, that allows us to store all our gear comfortably, sit comfortably out of the cold and sleep “downstairs” should the weather be so bad that the roof can’t be popped up or we find the need to stealth camp.
Front Cab Upgrades
Up front, where the driver and co-pilot (passenger/wife) sit, we have made a whole host of changes, in summary these are:
- Upgraded Stereo – With CarPlay and AndriodAuto
- Dashmat
- Armrests
- Dashpod
- Switch Panel
- Electronic rear-view mirror
- UHD dashcam and HD rear cam
- Speaker pods
- Floormats
- USB charging points for passenger and driver
- Quadlock passenger and driver wireless phone mounts
- Gear lever extension (50mm/2″)
Still to come in the Troopy Overland Build
- Exhaust – Torqit
- Gullwing – Drifta
- Alu-Cab Shower Cube